發表文章

目前顯示的是有「ESP32」標籤的文章

Esp32 MD5 設定與查詢方法

圖片
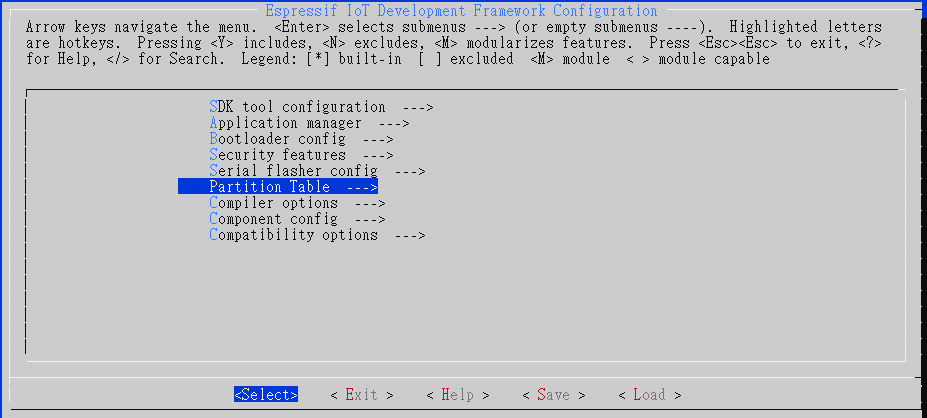
  如何開啟或關閉MD5: 打開menuconfig->Partition Table: 可以看到預設已經有打開MD5 checksum Build code 按一般流程進行build code。 打開 partition-table.bin 位置在專案資料夾內build/partition_table/,會有一個partition-table.bin,用可看二進制的工具打開,可以看到正常的partition table後面會多一串32 bytes的數據: 所以 MD5就是: F4AD4F4538564B5D7435B62C75B69524 Menuconfig關閉MD5: 在menuconfig中關閉MD5,build後再開啟partition table,可以看到: 後面沒有MD5的資料。

ESP32學習筆記-OTA 注意事項

圖片
這篇主要真對這幾天要使用ESP32開發專案,將examples中直直制專案內朽發現的問題,以及解決的方法 undefined reference to `_binary_ca_cert_pem_start 一開始移植後遇到這個問題,經過搜尋以及嘗試後解決方法如下:        將範例中的server_certs及裡面的ca_certpem 一起複製到自己的專案 打開main.資料夾中的CMakeLists.txt,加入" set(COMPONENT_EMBED_TXTFILES ${IDF_PROJECT_PATH}/server_certs/ca_cert.pem) " E (86336) esp_ota_ops: not found otadata 解決方法法就是 make menuconfig->partition Table->勾選Factory app,  two OTA definitions

ESP32學習筆記-常見的系統API

這篇做一個紀錄,將常用的系統API紀錄在這邊  esp_restart(): 系統軟體重起功能,  esp_chip_info() 得到chip的相關數據,使用方法: /* Print chip information */ esp_chip_info_t chip_info; esp_chip_info( & chip_info); printf( "This is ESP32 chip with %d CPU cores, WiFi%s%s, " , chip_info.cores, (chip_info.features & CHIP_FEATURE_BT) ? "/BT" : "" , (chip_info.features & CHIP_FEATURE_BLE) ? "/BLE" : "" ); printf( "silicon revision %d, " , chip_info.revision); printf( "%dMB %s flash \n " , spi_flash_get_chip_size() / ( 1024 * 1024 ), (chip_info.features & CHIP_FEATURE_EMB_FLASH) ? "embedded" : "external" );   vTaskDelay(1000 / portTICK_PERIOD_MS) 這個比較偏FreeRTOS的東西,不過在這邊先做紀錄  

ESP32學習筆記(四)-關閉Ecpipse 錯誤提示

圖片
-用Aithinker IDE有一個問題就是程式碼長長出現錯誤提示: 造成程式碼閱讀困難 關閉方法: Windows->Preferences->General->Editors->Text Editors->Annotations -點選Code Errors -旁邊勾勾取消 完成

ESP32學習筆記(三)-使用example步驟

圖片
此篇為要從esp-idf example中的範例移至app資料夾的步驟,拿hello_world為舉例 1.打開專案中的/app資料夾 -將資料夾main的內容全部刪除 -將/app資料夾中除了/build 以及/.git資料夾之外的資料刪除 -打開example/get-started/hello_world -將main資料夾內全部檔案移至/app/main -其餘資料複製至/app資料夾內 2.打開Aithinker_IDE,Build code步驟參考學習筆記(一)

ESP32學習筆記(二)-esp32燒錄固件步驟

圖片
1.接腳設定: -由於開發版多種,但本質上都是透過uart進行燒入,tx/rx接好即可 2.到樂鑫下載flash tool: - flash Tool下載網頁 -打開flash_download_tools_v3.6.5.exe(目前版本) -點擊ESP32 Download Tool 3.設定參數: -參考官方文件,燒入有3個檔案 -按下圖進行設定 -注意事項: START之前記得將GPIO0接地後重啟 下一篇: ESP32學習筆記(三)-使用example步驟

ESP32學習筆記(一)-ESP32-IDF 建置步驟

圖片
官方文件的IDE使用上複雜,跟ESP8266一樣使用安信可的AithinkerIDE 載點: AIthinkerIDE 這套IDE使用上簡單明瞭,安裝方法簡單就不多寫了 ------------------------------------------- 1.安裝Aithinker_IDE 2.打開configTool.exe 3.Cygwin/home/aithinker/project -將esp-idf資料夾整個刪掉 -到 esp sdk網站 下載ESP32-IDF -載完後將esp-idf-v3.1.3(目前下載版號為3.1.3)拉到Cygwin/home/aithinker/project 4.打開cygwin/Cygwin.bat - cd project - cd esp-idf-v3.1.3 - git clone https://github.com/espressif/esp-idf-template app  5.打開AiThinker_IDE.exe 6.刪除原本的esp-idf專案 7.導入專案:File->Import->點選"Existing Code as Makefile Project" 8.導入cygwin/home/aithinker/project/esp-idf-v3.1.3    -點選Cygwin GCC   -Finish 9.設定 -esp-idf-v3.1.3右鍵->Properties -c/c++ Build -Build directory欄後面加上app -Apply -ok 10設定Target -右鍵->Make Targets->Create -Target name: MeanuConfig -Build command : mintyy.exe -e make menuconfig -第二欄Make Target的Same as the target name勾勾取消,Make target清空 ...