發表文章

目前顯示的是 3月, 2019的文章

ESP32學習筆記(五)-ESP32-IDF 使用官方步驟建置教學

圖片
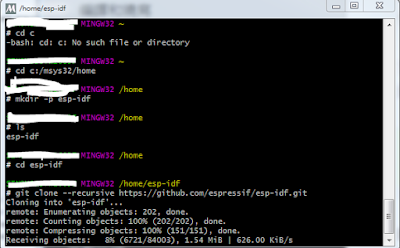
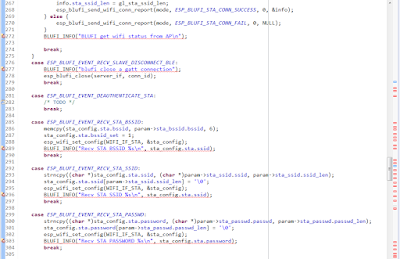
由於安信可的Aithinker IDE有瑕疵,從git少上 clone下來的無法使用 只好乖乖使用官方的ESP-IDF建置來使用 準備工作: 1.MSY32: 下載 2.TTL轉COMPORT  ---------------------------------------------------------------- 1.下載後將MSY32移出至PC,運行c:\msys32/mingw32.exe 2.輸入 cd c:/msys32/home 4.從github上clone esp-idf下來: - git clone --recursive https://github.com/espressif/esp-idf.git 注意這裡有個 --recursive 選項。 如果你克隆ESP-IDF時沒有帶這個選項,你還需要運行額外的命令來獲取子模塊: cd esp-idf git submodule update --init 5.接下來要設定IDF_PATH: -打開C:\msys32\etc\profile.d -新增一個檔案  export_idf_path.sh( 每次打開msy32窗口都會進入 ) ,  並用 用記事本或notepad+開啟 -在裡面新增:export IDF_PATH="C:/msys32/home/esp-idf" -重新打開msy32.exe,輸入 printenv IDF_PATH 6.創建專案: - cd c:/msys32/home/esp-idf -  mkdir app (建立一個資料夾) - cd app -  cp -r $IDF_PATH/examples/get-started/hello_world . - cd hello_world (也可以直接打開資料夾將example的檔案移出在改名) 7.準備就緒: -到此步驟完成,準備build code,先將開發版或串口接好並確認com port -  cd  c:/msys32/home/esp-idf/app/Hello_World -make menuconfig

ESP32學習筆記(四)-關閉Ecpipse 錯誤提示

圖片
-用Aithinker IDE有一個問題就是程式碼長長出現錯誤提示: 造成程式碼閱讀困難 關閉方法: Windows->Preferences->General->Editors->Text Editors->Annotations -點選Code Errors -旁邊勾勾取消 完成

ESP32學習筆記(三)-使用example步驟

圖片
此篇為要從esp-idf example中的範例移至app資料夾的步驟,拿hello_world為舉例 1.打開專案中的/app資料夾 -將資料夾main的內容全部刪除 -將/app資料夾中除了/build 以及/.git資料夾之外的資料刪除 -打開example/get-started/hello_world -將main資料夾內全部檔案移至/app/main -其餘資料複製至/app資料夾內 2.打開Aithinker_IDE,Build code步驟參考學習筆記(一)

ESP32學習筆記(二)-esp32燒錄固件步驟

圖片
1.接腳設定: -由於開發版多種,但本質上都是透過uart進行燒入,tx/rx接好即可 2.到樂鑫下載flash tool: - flash Tool下載網頁 -打開flash_download_tools_v3.6.5.exe(目前版本) -點擊ESP32 Download Tool 3.設定參數: -參考官方文件,燒入有3個檔案 -按下圖進行設定 -注意事項: START之前記得將GPIO0接地後重啟 下一篇: ESP32學習筆記(三)-使用example步驟

ESP32學習筆記(一)-ESP32-IDF 建置步驟

圖片
官方文件的IDE使用上複雜,跟ESP8266一樣使用安信可的AithinkerIDE 載點: AIthinkerIDE 這套IDE使用上簡單明瞭,安裝方法簡單就不多寫了 ------------------------------------------- 1.安裝Aithinker_IDE 2.打開configTool.exe 3.Cygwin/home/aithinker/project -將esp-idf資料夾整個刪掉 -到 esp sdk網站 下載ESP32-IDF -載完後將esp-idf-v3.1.3(目前下載版號為3.1.3)拉到Cygwin/home/aithinker/project 4.打開cygwin/Cygwin.bat - cd project - cd esp-idf-v3.1.3 - git clone https://github.com/espressif/esp-idf-template app  5.打開AiThinker_IDE.exe 6.刪除原本的esp-idf專案 7.導入專案:File->Import->點選"Existing Code as Makefile Project" 8.導入cygwin/home/aithinker/project/esp-idf-v3.1.3    -點選Cygwin GCC   -Finish 9.設定 -esp-idf-v3.1.3右鍵->Properties -c/c++ Build -Build directory欄後面加上app -Apply -ok 10設定Target -右鍵->Make Targets->Create -Target name: MeanuConfig -Build command : mintyy.exe -e make menuconfig -第二欄Make Target的Same as the target name勾勾取消,Make target清空

ESP32學習筆記(前言)-ESP32 相關筆記

圖片
ESP32-WROOM-32 腳位圖