ESP32學習筆記(一)-ESP32-IDF 建置步驟
官方文件的IDE使用上複雜,跟ESP8266一樣使用安信可的AithinkerIDE
載點:AIthinkerIDE
這套IDE使用上簡單明瞭,安裝方法簡單就不多寫了
-------------------------------------------
1.安裝Aithinker_IDE
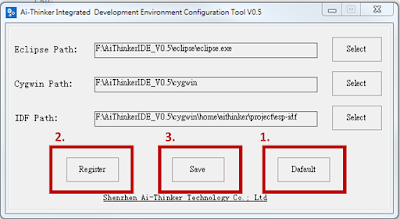
2.打開configTool.exe
10設定Target
-右鍵->Make Targets->Create
-Target name:MeanuConfig
-Build command :mintyy.exe -e make menuconfig
載點:AIthinkerIDE
這套IDE使用上簡單明瞭,安裝方法簡單就不多寫了
-------------------------------------------
1.安裝Aithinker_IDE
2.打開configTool.exe
3.Cygwin/home/aithinker/project
-將esp-idf資料夾整個刪掉
-到esp sdk網站下載ESP32-IDF
-載完後將esp-idf-v3.1.3(目前下載版號為3.1.3)拉到Cygwin/home/aithinker/project
4.打開cygwin/Cygwin.bat
- cd project
- cd esp-idf-v3.1.3
-git clone https://github.com/espressif/esp-idf-template app
5.打開AiThinker_IDE.exe
6.刪除原本的esp-idf專案
7.導入專案:File->Import->點選"Existing Code as Makefile Project"
8.導入cygwin/home/aithinker/project/esp-idf-v3.1.3
-點選Cygwin GCC
-Finish
9.設定
-esp-idf-v3.1.3右鍵->Properties
-c/c++ Build
-Build directory欄後面加上app
-Apply
-ok
10設定Target
-右鍵->Make Targets->Create
-Target name:MeanuConfig
-Build command :mintyy.exe -e make menuconfig
-第二欄Make Target的Same as the target name勾勾取消,Make target清空
11.Build Target:
-右鍵->Make Target->Build->點選MenuConfig->Build
-Build完會出現下圖:
到此步驟設定完成
12.Build Code:
-右鍵->Clean Project(第一次要clean,之後可不clean要不然build會很久)
-->Build Project
13.Build完成:
下一篇:ESP32學習筆記(二)


留言
張貼留言